Cart is empty

Blog

Autumn is coming and I have been busy at the bench…

September 3, 2015

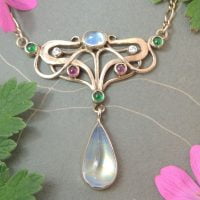
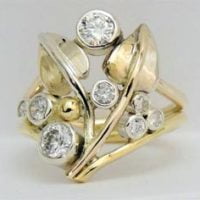
Here are two quite different pieces I have made recently. One was a flight of fancy and is for sale at a smidgen under four figures! It is a pendant that measures 53mm from top to bottom and I made it in yellow and white gold and set it with a stunning rainbow moonstone and an unusual piece of lapis lazuli and three twinkling diamonds.  I have called it Wish Upon A Star! The ring on the left was a commission and I made it in 18ct gold, it is set with a pretty blue sapphire and diamonds to...

The first step is to draw the designs

April 9, 2015

The first step is to draw the designs; if it is for a production piece the inspiration can come out of my head from some idea or shape that has occurred to me.  That inspiration might be a cat sitting on the sofa in a particular position or a flower from the garden or simply one of my hallmark leaves!  The wonderful flowing lines of both Art Nouveau and Celtic knots just seem to come out on the page when I pick up a pencil and start drawing. I also think about how many different ways the design can...

Now comes the first tricky bit

January 1, 2014

Now comes the first tricky bit, translating a few lines on a page into a 3D piece of jewellery. I use fine piercing saws to cut out shapes from sheet, and use various methods to change the shape of the sheet, sometimes bending with fingers or with pliers, sometimes using doming tools, sometimes files of varying shapes and sizes, sometimes using hammers, sometimes my rolling mill.   Wires come in a wonderfully diverse range of shapes and I use similar techniques to those I use on the sheet to alter the shape and flow of the metal. So I make...

Solder the pieces together

December 30, 2013

The next step is to solder the pieces together using a gas blowtorch – or two at the same time if it’s a big job – to melt the solder.  A lot of heat is needed to melt precious metal solder.  Not far below the melting temperature of the metal itrself. To ensure that they do not contaminate the metal they need to be of the same carat or grade as the metals you are joining.  A great deal of patience is needed for this part of the process.  It’s probably the part that takes the most swearing!!  Solder...

Adding my unique mark

December 16, 2013

Now that my piece of jewellery is made, before it is set with the stones and polished it has to be sent to the Edinburgh Assay Office for testing and hallmarking. Every piece is tested for purity and will not be hallmarked if it fails.  For instance if I were to use 9ct gold and 18ct gold together then the piece would be marked as the lower purity of 9ct. Before it goes off to the Assay Office every piece of jewellery has to be marked by me with my unique mark – in my case it is JT...

Setting the stones

December 16, 2013

Once the piece has been tested, passed and fully hallmarked then I can set the stones.  No glue used here!  It is vital that when I have made the settings I have been really accurate.  Too big and the setting can look uneven and cover too much of the stone, too small and it simply will not fit!  Trying to encourage a stone to fit into a setting that is too small or not quite the right shape will always end in tears!!   To hold the stones the metal is pushed over onto them to keep them in place...

The final process is polishing

August 11, 2013

The final process is polishing.  Most pieces are barrelled first for a few hours to get into the backs and parts that are hard to reach with polishing mops.  Going into the polishing shed requires some covering up and wearing a face mask. It’s a filthy business!  Not the least bit romantic but it is lovely to see the real shine of the metal coming through as I attack each piece with 4 inch buffs travelling at 3000 rpm on my big polishing machines! Great care is needed to avoid polishing away fine details or having the mop grab...